

Looking for a dessert that’s irresistibly simple yet incredibly delicious? The icebox cake is your no-bake, crowd-pleasing solution. With just a few ingredients and zero oven time, this chilled treat layers flavor and texture in the most satisfying way—discover how this vintage classic is making a modern comeback!
Icebox Cake
| Servings: | 10 |
| Prep Time: | 20 minutes |
| Cook Time: | 6 hours |
| Total Time: | 6 hours 20 minutes |
| Serving Size: | 1 slice |
Description
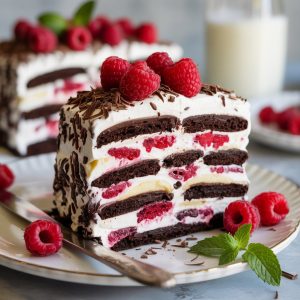
Classic icebox cake is the ultimate no-bake dessert that tastes like childhood summers and backyard cookouts. With layers of crisp chocolate wafer cookies softened by sweet whipped cream, it transforms into a cool, creamy, and dreamy treat. By simply letting it chill in the fridge for a few hours, this simple dessert magically becomes a cake-like creation with a melt-in-your-mouth texture.
Each bite is silky and rich while still feeling light, like a chocolate cloud with just the right amount of sweetness. This recipe is nostalgic for many Americans who remember their mothers or grandmothers making it from pantry staples. It is akin to magic—the way the cookies meld with the whipped cream, softening into something truly special.
Why You’ll Love This Recipe
This icebox cake recipe requires no baking, no special skills, and just a handful of ingredients, making it perfect for hot summer days or last-minute dinner parties. It comes together in mere minutes and relies on chilling in the fridge to work its magic.
You can also customize this recipe with different cookie types, flavored whipped creams, or fresh berries. It is endlessly versatile and an excellent make-ahead dessert that tastes even better the next day. Whether you are a busy parent or a beginner baker, this is a dessert that delivers maximum flavor with minimal effort.
Serving and Storage Tips
Icebox cake should be stored in the refrigerator and is best enjoyed chilled. It needs a minimum of 6 hours to set but is even better when left overnight.
Once assembled, cover the cake tightly with plastic wrap or a lid and refrigerate. It can last for up to 4 days in the fridge.
While freezing is not recommended, you can prepare it up to two days in advance, making it a perfect prep-ahead dessert for holidays or gatherings. For cleaner slices, use a sharp knife and wipe it clean between cuts.
Ingredients
- 2 cups heavy whipping cream
- 3 tablespoons granulated sugar
- 1 teaspoon vanilla extract
- 1 package chocolate wafer cookies
- Shaved chocolate or cocoa powder for garnish
Equipment
- Mixing bowl
- Electric hand mixer or stand mixer
- 8-inch or 9-inch loaf pan or square dish
- Spatula
- Plastic wrap
Instructions
- Chill your tools: For best results, place your mixing bowl and beaters in the freezer for about 10 minutes before whipping the cream. This helps the cream whip up fluffier and faster.
- Make the whipped cream: In the chilled mixing bowl, add the heavy whipping cream, granulated sugar, and vanilla extract.
- Whip until stiff peaks form: Beat on medium-high speed using a hand mixer or stand mixer, stopping just when the cream holds stiff peaks. Keep an eye on it to avoid overwhipping.
- Create the base layer: Spread a thin layer of whipped cream in the bottom of your loaf or square pan. This keeps the first layer of cookies in place.
- Layer the cookies: Add a single layer of chocolate wafer cookies over the whipped cream, slightly overlapping if necessary. Break some cookies if needed to fit the edges.
- Add whipped cream: Spread a healthy dollop of whipped cream over the cookie layer and smooth it out gently with a spatula.
- Repeat the layers: Continue alternating layers of cookies and whipped cream until you reach the top of the pan, finishing with a smooth layer of cream.
- Cover and chill: Tightly wrap the cake with plastic wrap and refrigerate for at least 6 hours. Overnight is even better.
- Decorate: Just before serving, add shaved chocolate or a light dusting of cocoa powder for a pretty finishing touch.
- Slice and serve: Use a sharp knife to slice cleanly. Wipe the blade after each cut for neat servings. Serve chilled.
Nutrition per serving
| Calories | 320 |
| Protein | 2g |
| Carbohydrates | 26g |
| Fat | 20g |
| Sugar | 16g |
| Fiber | 1g |
| Sodium | 120mg |
Recipe Notes
For an extra indulgent twist, swirl in a little espresso powder into the whipped cream or layer in chocolate chips. This cake gets even better after a day in the fridge.
FAQ
Can I use homemade cookies?
Yes, you can use homemade chocolate wafer cookies or even chocolate shortbread. Just make sure they are crisp so they absorb the cream while chilling.
What if I do not have chocolate wafers?
Try using graham crackers, digestive biscuits, or vanilla wafers. The flavor will shift slightly but still taste delicious and have that soft cake-like texture after chilling.
Can I flavor the whipped cream?
Absolutely. A splash of almond extract, citrus zest, or even a spoonful of cocoa powder can lend a unique twist. Just avoid adding too much liquid or it may affect how well the cream holds up.
We hope you enjoyed this article about no-bake icebox cake! If you did, we’d love to hear your thoughts—feel free to leave a comment and let us know. And if it’s not too much trouble, please pin this article or any photo from it on Pinterest and give it a like—it really helps us reach more people and keeps us inspired to create even more delicious content for you. Thank you! 💛
Icebox Cake
Ingredients
- 2 cups heavy whipping cream
- 3 tablespoons granulated sugar
- 1 teaspoon vanilla extract
- 1 package chocolate wafer cookies
- Shaved chocolate or cocoa powder for garnish
Instructions
- In a large mixing bowl, add the heavy whipping cream, sugar, and vanilla extract.
- Beat with an electric hand mixer or stand mixer on medium-high speed until stiff peaks form, about 3 to 5 minutes.
- Spread a thin layer of whipped cream on the bottom of a loaf pan or square dish to anchor the first layer of cookies.
- Arrange a single layer of chocolate wafer cookies over the cream, breaking some cookies if needed to fill gaps.
- Spread a generous layer of whipped cream over the cookies, smoothing it out with a spatula.
- Repeat the layering process, alternating cookies and whipped cream, until you reach the top of the dish, finishing with a layer of whipped cream.
- Cover the dish tightly with plastic wrap and refrigerate for at least 6 hours or overnight to allow the cookies to soften.
- Just before serving, garnish the top with shaved chocolate or a light dusting of cocoa powder.
- Slice and serve chilled.


