
If you’ve ever dreamed of making restaurant-quality sushi at home, this sushi recipe is your perfect starting point. With simple ingredients, easy steps, and a few chef secrets, you’ll be rolling like a pro in no time. Ready to impress your taste buds—and your guests? Let’s dive in!
| Servings: | 4 |
| Prep Time: | 30 minutes |
| Cook Time: | 20 minutes |
| Total Time: | 50 minutes |
| Serving Size: | 1 plate |
Sushi Recipe
Description
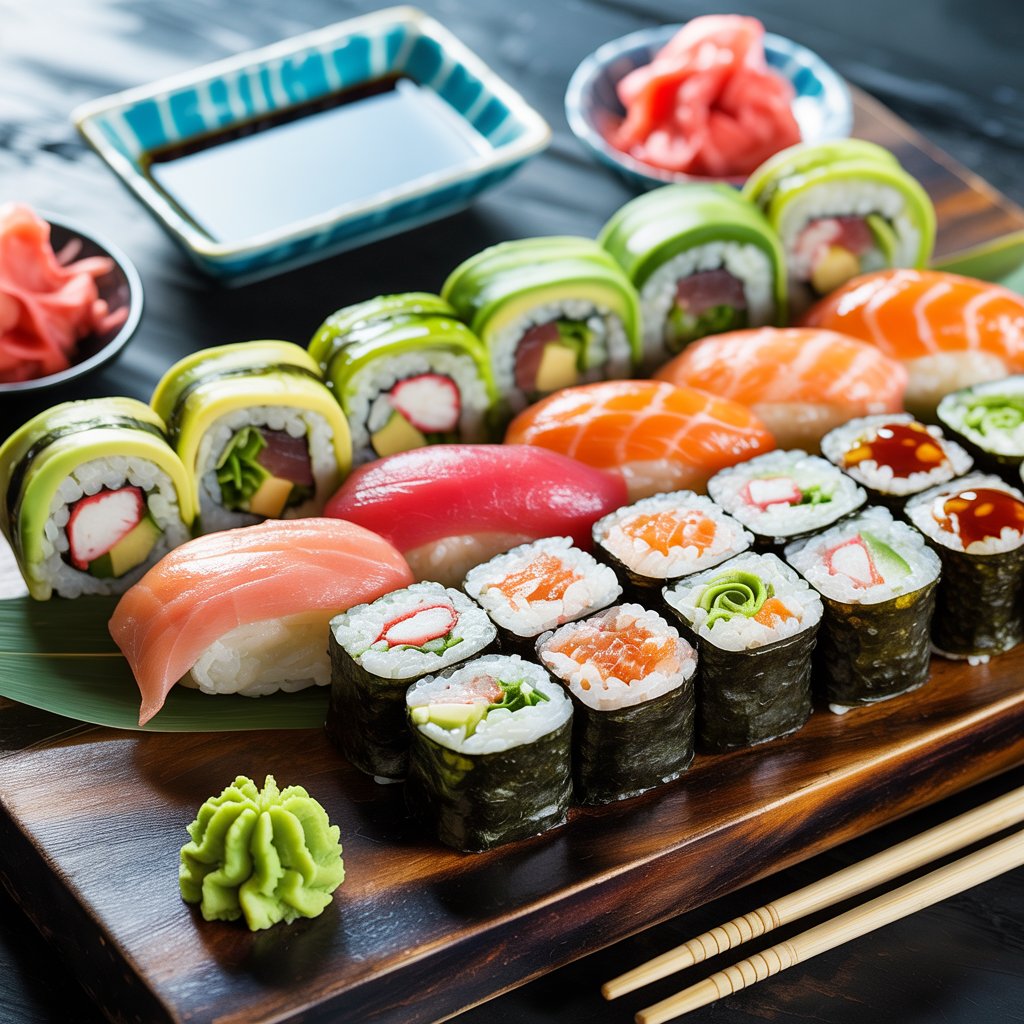
Biting into a freshly made sushi roll is like savoring an ocean breeze tucked into a bundle of elegance. Each bite offers a graceful balance of textures and flavors—from the gentle chew of vinegared rice to the vibrant snap of fresh vegetables and silky fish. Sushi is more than just food; it is an experience. The way it plays with the senses, both in flavor and presentation, is like edible art on your plate.
Whether you are crafting a simple cucumber roll or going bold with spicy tuna, sushi delivers a cooling, refreshing sensation with every bite. It is the kind of dish that surprises you with how satisfying and clean it tastes. Even if you are not a seasoned sushi chef, crafting sushi at home is a fun and rewarding way to gather around the kitchen table for a hands-on culinary adventure.
Why You’ll Love This Recipe
This sushi recipe is accessible to beginners but customizable enough to delight experienced home cooks. Whether you are craving a healthy lunch, a showstopping appetizer for a party, or a fun family night activity, sushi delivers. The ingredients are easy to source at most grocery stores and the process is simpler than you think—especially with step-by-step guidance.
Homemade sushi allows for total control over ingredients, so it is perfect for dietary needs. You can keep it vegetarian, gluten-free, or load it with nutrient-rich fillings like avocado, salmon, or pickled daikon. It is light yet filling, indulgent yet balanced—a true celebration of flavor and health in a single roll.
Serving and Storage Tips
Sushi is best enjoyed fresh after rolling but can be stored for later. If making it ahead, wrap each roll tightly in plastic wrap and store in an airtight container in the refrigerator. Enjoy within 24 hours for the best texture and flavor.
Leftover sushi with raw fish should not be left out for more than two hours. For vegetarian sushi or cooked fillings, you can safely store them in the fridge for up to 2 days. Do not freeze sushi, as the texture of the rice and fillings will degrade. Prep ingredients like sushi rice and chop fillings up to a day ahead for a smoother sushi-making experience.
Ingredients
- 1 cup sushi rice
- 1 1⁄4 cups water
- 2 tablespoons rice vinegar
- 1 tablespoon sugar
- 1⁄2 teaspoon salt
- 4 sheets nori seaweed
- 1⁄2 cucumber julienned
- 1 avocado sliced
- 1 small carrot julienned
- 4 ounces sushi-grade raw fish or imitation crab sticks
- Soy sauce for serving
- Pickled ginger for serving
- Wasabi for serving
Equipment
- Medium saucepan with lid
- Small bowl
- Wooden spoon or rice paddle
- Bamboo sushi rolling mat
- Sharp knife
- Cutting board
- Plastic wrap
- Small ramekin for dipping water
Instructions
- Rinse the sushi rice thoroughly in a fine mesh strainer under cold water until the water runs clear. This step removes excess starch and helps achieve that glossy, non-gummy texture later.
- Cook the rice by combining it with measured water in a saucepan. Bring to a boil, then reduce heat to low. Cover and simmer for 20 minutes or until water is fully absorbed.
- Steam it off heat by removing the pot from the heat and letting it sit with the lid on for 10 minutes. This keeps the rice fluffy without overcooking.
- Prepare the seasoning by mixing rice vinegar, sugar, and salt in a small bowl until dissolved. Warming the vinegar slightly helps it dissolve faster.
- Season the rice by gently folding the vinegar mixture into the cooked rice with a wooden paddle or spoon. Spread the rice in a wide shallow bowl to encourage cooling. Do not stir aggressively or the grains may break.
- Set up your sushi station by placing a piece of plastic wrap over your bamboo mat. Place one nori sheet shiny side down on the mat. The shiny side will face outwards after rolling.
- Spread the rice evenly over the nori, using wet fingers to prevent sticking. Leave the top inch of the nori clear so you can seal the roll later.
- Add the fillings in a neat horizontal line across the lower third of the rice. Use a handful of your favorite wraps—cucumber, avocado, crab sticks, or tuna are all delicious starters.
- Roll it up by lifting the edge of the mat and rolling away from you. Use gentle pressure to keep the roll tight but do not squeeze too hard or the fillings may spill out.
- Seal the roll by wetting the bare edge of the nori and pressing it to close the roll securely.
- Slice the roll into 6 to 8 pieces using a sharp knife. Moisten your knife with water between cuts to prevent sticking and create cleaner pieces.
- Serve and enjoy with small dishes of soy sauce, pickled ginger, and wasabi. A touch of wasabi is optional, but it really adds depth and cuts through rich flavors.
Nutrition per serving
| Calories | 320 |
| Protein | 25g |
| Carbohydrates | 3g |
| Fat | 22g |
| Sugar | 0g |
| Fiber | 0g |
| Sodium | 580mg |
Recipe Notes
For extra flavor, use freshly grated Parmesan and do not skip the lemon zest. Leftovers keep well for 2 days in the fridge.
FAQ
Can I use frozen fish for sushi?
You can use frozen sushi-grade fish as long as it has been flash-frozen and stored properly. Thaw it in the refrigerator and use it the same day for safety and texture.
What if I do not have rice vinegar?
You can substitute apple cider vinegar or white wine vinegar in small amounts, although it will slightly change the flavor. Add a pinch more sugar to balance the acidity.
Can I pack sushi for lunch?
Absolutely. Pack it tightly in a sealed container with an ice pack. Vegetarian or fully cooked rolls are best for this purpose. Avoid raw fish for packed lunches if refrigeration is not steady.
We hope you enjoyed this article about garlic butter zucchini skewers recipe! If you did, please take a moment to pin this post or any image from the article on Pinterest — it really helps more people discover our content. Don’t forget to like the pin and leave us a comment — we’d love to hear your thoughts! Your support inspires us to keep creating and getting better every day. 💛

Sushi Rolls
Ingredients
- 1 cup sushi rice
- 1 1/4 cups water
- 2 tablespoons rice vinegar
- 1 tablespoon sugar
- 1/2 teaspoon salt
- 4 sheets nori seaweed
- 1/2 cucumber julienned
- 1 avocado sliced
- 1 small carrot julienned
- 4 ounces sushi-grade raw fish or imitation crab sticks
- Soy sauce for serving
- Pickled ginger for serving
- Wasabi for serving
Instructions
- Rinse the sushi rice in a fine mesh strainer under cold water until the water runs clear.
- In a medium saucepan, combine the rinsed rice and water. Bring to a boil over medium heat.
- Once boiling, reduce heat to low, cover, and simmer for 20 minutes or until all the water is absorbed.
- Remove the pan from heat and let the rice sit covered for 10 minutes.
- In a small bowl, mix the rice vinegar, sugar, and salt until dissolved.
- Spread the rice into a wide shallow bowl and gently fold in the vinegar mixture with a wooden spoon. Allow the rice to cool to room temperature.
- Place a sheet of plastic wrap over your bamboo mat. Lay one sheet of nori shiny side down on the plastic.
- Wet your fingers and press a thin layer of sushi rice evenly over the nori, leaving the top inch clear of rice.
- Arrange your choice of fillings in a horizontal line across the lower third of the rice.
- Use the bamboo mat to roll the sushi tightly away from you, pressing gently to form a compact roll.
- Seal the edge with a small amount of water and complete the roll.
- Use a sharp knife to slice the roll into six to eight pieces. Clean the knife between slices for neat, uniform pieces.
- Serve immediately with soy sauce, pickled ginger, and wasabi.


