
Homemade peanut butter cups are easier to make than you think—and they taste even better than store-bought! With just a handful of simple ingredients and a few minutes of your time, you can whip up a rich, creamy, chocolatey treat that’s downright irresistible. Ready to discover the secret to making these bite-sized delights in your own kitchen? Keep reading!
Homemade Peanut Butter Cups
| Servings: | 12 |
| Prep Time: | 25 minutes |
| Cook Time: | 5 minutes |
| Total Time: | 30 minutes |
| Serving Size: | 1 cup |
Description
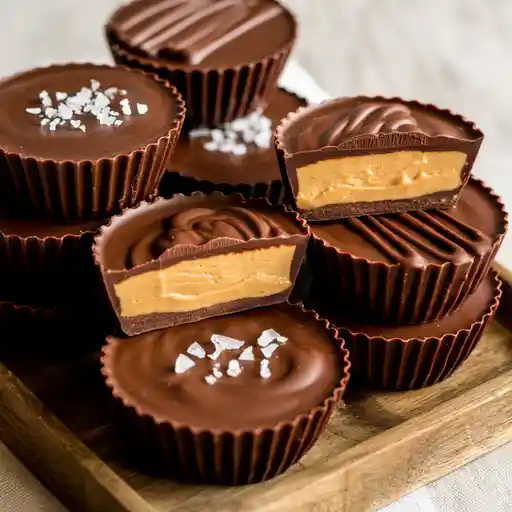
Homemade peanut butter cups are one of my favorite indulgences to make when I want something rich, simple, and soul-satisfying. Think creamy peanut butter tucked into a silky chocolate shell that cracks ever so slightly as you bite in. It is the kind of treat that melts away stress and makes your inner child do a happy dance.
When I first made these, I was amazed how effortless they were and how much better they tasted than store-bought. Since then, they have become a go-to for gifting, parties, and those quiet nighttime cravings. Whether it is your first time making candy or you are a seasoned home cook, these come together easily and are endlessly fun to tweak.
Why You’ll Love This Recipe
- Only six ingredients you probably already have
- No oven required so it is perfect for warm weather
- Customizable with your favorite nut butters or added crunch
- Kid-friendly to make and eat
- Stores beautifully in the fridge or freezer
Serving and Storage Tips
After they have chilled and set completely, store these peanut butter cups in an airtight container. I like to keep them in the refrigerator for a slightly firm texture, though the freezer is a great option if you plan to store them long-term. Just allow them to sit at room temperature five to ten minutes before enjoying.
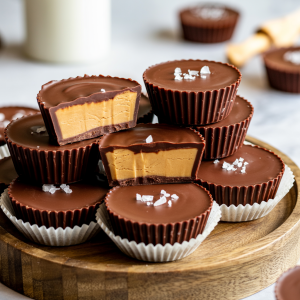
For gifting, place them in mini cupcake wrappers inside a small gift box or stack a few in a mason jar tied with ribbon. They are always a hit and make such a thoughtful handmade treat.
Ingredients
- 1 and 1 half cups semisweet or dark chocolate chips
- 3 tablespoons coconut oil or butter
- 1 cup creamy peanut butter
- 1 fourth cup powdered sugar
- 1 eighth teaspoon salt
- 1 half teaspoon vanilla extract
Equipment
- 12 count muffin pan
- Paper cupcake liners
- Heatproof mixing bowls
- Microwave or stovetop
- Spatula
- Spoons
Instructions
- Step 1: Line a 12 count muffin pan with cupcake liners. This makes the cups easy to remove once chilled and helps keep their shape. Set aside.
- Step 2: In a heatproof bowl, combine 1 and 1 half cups of chocolate chips with 1 and 1 half tablespoons of coconut oil. Microwave in 30 second bursts, stirring after each, until silky and fully melted. You can also melt the mixture on the stovetop using a double boiler.
- Step 3: Spoon 1 to 1 and a half teaspoons of the melted chocolate into the base of each cupcake liner. Use the back of the spoon to gently nudge the chocolate partway up the sides. This forms your chocolate shell bottom. Transfer the pan to the freezer for 10 minutes to set.
- Step 4: While the bottom sets, mix the filling. In a second bowl, stir together the peanut butter, powdered sugar, remaining 1 and a half tablespoons coconut oil, salt, and vanilla. It should look glossy and hold its shape.
- Step 5: Remove the muffin tin from the freezer. Drop 1 tablespoon of the peanut butter mixture into each cup and gently flatten with your fingers or the back of a spoon. Try to keep the filling away from the edges so the top layer of chocolate can seal everything in.
- Step 6: Spoon 1 to 1 and a half teaspoons of melted chocolate over each peanut butter cup, smoothing the top with the spoon until fully covered.
- Step 7: Return the pan to the freezer for 10 to 15 minutes more, or until fully set and firm to the touch.
- Step 8: Once chilled, peel away the paper liners and enjoy. If storing, keep in an airtight container in the fridge or freezer depending on your texture preference.
Nutrition per serving
| Calories | 210 |
| Protein | 4 grams |
| Carbohydrates | 17 grams |
| Fat | 15 grams |
| Sugar | 12 grams |
| Fiber | 2 grams |
| Sodium | 60 milligrams |
Recipe Notes
You can use any type of nut butter such as almond or cashew if you prefer or need a peanut free version. For a vegan option, make sure to use dairy free chocolate chips and coconut oil instead of butter.
To make these peanut butter cups slightly crunchier, stir in crushed graham crackers or rice crisp cereal into the peanut butter mixture.
They are great for parties or gifting. Simply place them in mini candy boxes or wrap each one in parchment paper and secure with a string.
FAQ
Can I use natural peanut butter?
Yes. Just be sure to mix it thoroughly before measuring. You want it creamy and uniform without too much oil separation. If too runny, the filling might not firm up correctly.
Do I need to temper the chocolate?
No tempering required here. Since these are stored chilled, the chocolate stays firm. But if you want that glossy shell and snappy bite at room temperature, tempering is a great idea.
Can I add toppings to them?
Absolutely. Sprinkle a few flakes of sea salt on top before the top layer sets or add crushed nuts for texture. Mini chocolate chips or shredded coconut also work beautifully.
We hope you enjoyed this article about homemade peanut butter cups! If you found it helpful or inspiring, please leave us a comment—we’d love to hear your thoughts. Don’t forget to pin this article or any image from it on Pinterest so more people can find and enjoy it too. And if you give our pin a like, it would mean the world to us—it really helps us create more great content for you!
Homemade Peanut Butter Cups
Ingredients
- 1 1/2 cups semisweet or dark chocolate chips
- 3 tablespoons coconut oil or butter
- 1 cup creamy peanut butter
- 1/4 cup powdered sugar
- 1/8 teaspoon salt
- 1/2 teaspoon vanilla extract
Instructions
- Line a 12-count muffin tin with paper cupcake liners. Set aside.
- In a microwave-safe bowl or double boiler, melt chocolate chips with 1 1/2 tablespoons coconut oil. Heat in 30 second increments, stirring, until smooth.
- Spoon 1 to 1 1/2 teaspoons of melted chocolate into each liner, spreading slightly up the sides. Freeze for 10 minutes to set.
- In another bowl, mix peanut butter, powdered sugar, remaining coconut oil, salt, and vanilla extract until smooth and creamy.
- Remove muffin tin from freezer. Drop about 1 tablespoon of peanut butter mixture into each cup, gently pressing it down without touching the sides.
- Top each cup with another 1 to 1 1/2 teaspoons melted chocolate, smoothing over the peanut butter to cover.
- Return pan to freezer for 10–15 minutes or until fully set.
- Once firm, remove peanut butter cups from liners and enjoy. Store extras in refrigerator or freezer.
